SpringMVC的本质
SpringMVC本质只是一个Servlet,Servlet的运行需要Servlet容器,常见的容器有Tomcat跟Jetty。Servlet的运行会调用一次init()跟一次destory()方法,用于初始化Servlet跟销毁Servlet。SpringMVC利用init()方法创建WebApplication的运行环境。(此时的WebApplication只是ServletWebApplicationContext,存储Controller、ViewResolver、HandlerMapping等)
所以SpringMVC的运行需要Servlet-api,而Servlet如Tomcat或者Jetty容器已经依赖了Servlet-api(如果是开发时使用插件形式,比如使用Tomcat插件,就需要手动引入)
SpringMVC的前身——Servlet
SpringMVC之前,就是Servlet。Spring MVC 是基于 Servlet 实现的。所以要分析 Spring MVC,首先应追根溯源,弄懂 Servlet。Servlet 是 J2EE 规范之一,在遵守该规范的前提下,我们可将 Web 应用部署在 Servlet 容器下。这样做的好处是什么呢?我觉得可使开发者聚焦业务逻辑,而不用去关心 HTTP 协议方面的事情。比如,普通的 HTTP 请求就是一段有格式的文本,服务器需要去解析这段文本才能知道用户请求的内容是什么。如果我们为了写一个 Web 应用,还要去解析 HTTP 协议相关的内容,那会增加很多工作量。
如果我们写的 Web 应用不大,不夸张的说,项目中对 HTTP 提供支持的代码会比业务代码还要多,这岂不是得不偿失。当然,在现实中,有现成的框架可用,并不需要自己造轮子。如果我们基于 Servlet 规范实现 Web 应用的话,HTTP 协议的处理过程就不需要我们参与了。这些工作交给 Servlet 容器就行了,我们只需要关心业务逻辑怎么实现即可。
Servlet的具体就是交给Servlet接口、ServletConfig、GenericServlet、HttpServlet这些类中实现,等有时间再详解。
运行SpringMVC的前期准备
SpringMVC要运行需要Servlet,这里我们使用Tomcat插件作为Servlet容器,先引入Servlet的api,虽然Servlet-api在Tomcat插件呢中已经存在,但是SpringMVC在编译时需要Servlet-api的存在,不然编译不通过
哦对,在这之前需要引入Spring的包有context,web,webmvc 下面会说这几个包的作用
完整的pom.xml如下1
2
3
4
5
6
7
8
9
10
11
12
13
14
15
16
17
18
19
20
21
22
23
24
25
26
27
28
29
30
31
32
33
34
35
36
37
38
39
40
41
42
43
44
45
46
47
48
49
50
51
52
53
54
55
56
57
58
59
60
61
62
63
64
65
66
67
68
69
70
71
72
73<?xml version="1.0" encoding="UTF-8"?>
<project xmlns="http://maven.apache.org/POM/4.0.0" xmlns:xsi="http://www.w3.org/2001/XMLSchema-instance"
xsi:schemaLocation="http://maven.apache.org/POM/4.0.0 http://maven.apache.org/xsd/maven-4.0.0.xsd">
<modelVersion>4.0.0</modelVersion>
<groupId>com.demo</groupId>
<artifactId>lnw-spring-mvc</artifactId>
<version>1.0-SNAPSHOT</version>
<packaging>war</packaging>
<name>lnw-spring-mvc Maven Webapp</name>
<!-- FIXME change it to the project's website -->
<url>http://www.example.com</url>
<properties>
<project.build.sourceEncoding>UTF-8</project.build.sourceEncoding>
<maven.compiler.source>1.8</maven.compiler.source>
<maven.compiler.target>1.8</maven.compiler.target>
</properties>
<dependencies>
<dependency>
<groupId>org.springframework</groupId>
<artifactId>spring-context</artifactId>
<version>5.0.8.RELEASE</version>
</dependency>
<!--引入Servlet-api,然后scope设置为provided,表示编译时存在,运行时可去除
因为Tomcat中已经有Servlet-api了,运行时使用Tomcat里面的Servelt-Api就可以了-->
<!-- https://mvnrepository.com/artifact/javax.servlet/javax.servlet-api -->
<dependency>
<groupId>javax.servlet</groupId>
<artifactId>javax.servlet-api</artifactId>
<version>3.1.0</version>
<scope>provided</scope>
</dependency>
<dependency>
<groupId>org.springframework</groupId>
<artifactId>spring-web</artifactId>
<version>5.0.8.RELEASE</version>
</dependency>
<dependency>
<groupId>org.springframework</groupId>
<artifactId>spring-webmvc</artifactId>
<version>5.0.8.RELEASE</version>
</dependency>
</dependencies>
<build>
<finalName>lnw-spring-mvc</finalName>
<pluginManagement><!-- lock down plugins versions to avoid using Maven defaults (may be moved to parent pom) -->
<plugins>
<!--添加Tomcat插件,设置路径和端口-->
<plugin>
<groupId>org.apache.tomcat.maven</groupId>
<artifactId>tomcat7-maven-plugin</artifactId>
<version>2.2</version>
<configuration>
<port>8080</port>
<path>/</path>
</configuration>
</plugin>
</plugins>
</pluginManagement>
</build>
</project>
引入的Servlet-api需要设置scope为provide表示编译时存在,运行时去除
Servlet容器跟依赖包都有了,接下来就是要让SpringMVC整合到Tomcat中
以前都是在web.xml配置,因为你Tomcat启动时会读取web.xml中的配置来启动加载SpringMVC的DispatcherServlet,但我这里想用java-config来配置,因为java-config配置更加直观一点(个人观点)
我们用一个MyWebApplicationInitializer类表示一个web.xml配置,用AppConfig类来配置Spring
我的理解是MyWebApplicationInitializer可以让Tomcat发现SpringMVC的存在并注册DispatcherServlet,AppConfig可以配置Spring的容器以及其他Spring属性
MyWebApplicationInitializer.java1
2
3
4
5
6
7
8
9
10
11
12
13
14
15
16
17
18
19
20
21
22package com.demo.config;
import org.springframework.web.WebApplicationInitializer;
import org.springframework.web.context.support.AnnotationConfigWebApplicationContext;
import org.springframework.web.servlet.DispatcherServlet;
import javax.servlet.ServletContext;
import javax.servlet.ServletRegistration;
public class MyWebApplicationInitializer implements WebApplicationInitializer {
@Override
public void onStartup(ServletContext servletCxt) {
System.out.println("------init------");
// Load Spring web application configuration
AnnotationConfigWebApplicationContext ac = new AnnotationConfigWebApplicationContext();
// 注册Spring的配置类
ac.register(AppConfig.class);
// ac.refresh();
// Create and register the DispatcherServlet
DispatcherServlet servlet = new DispatcherServlet(ac);
ServletRegistration.Dynamic registration = servletCxt.addServlet("app", servlet);
registration.setLoadOnStartup(1);
registration.addMapping("/");
}
}
这里的ac.refresh()之所以要注释掉,因为此时容器中还没有ServletContext,因为还没有将Tomcat容器中的ServletContext注入到Spring容器中,而SpringMVC中的有些组件需要ServletContext才能进行创建,如果此时没有ServletContext,在调用refresh时就会出现错误,显示“No ServletContext set”,比如resourceHandlerMapping这个Bean,在创建的时候就会进行断言
ServletContext的传入,在FrameworkServlet中,还没调用refresh前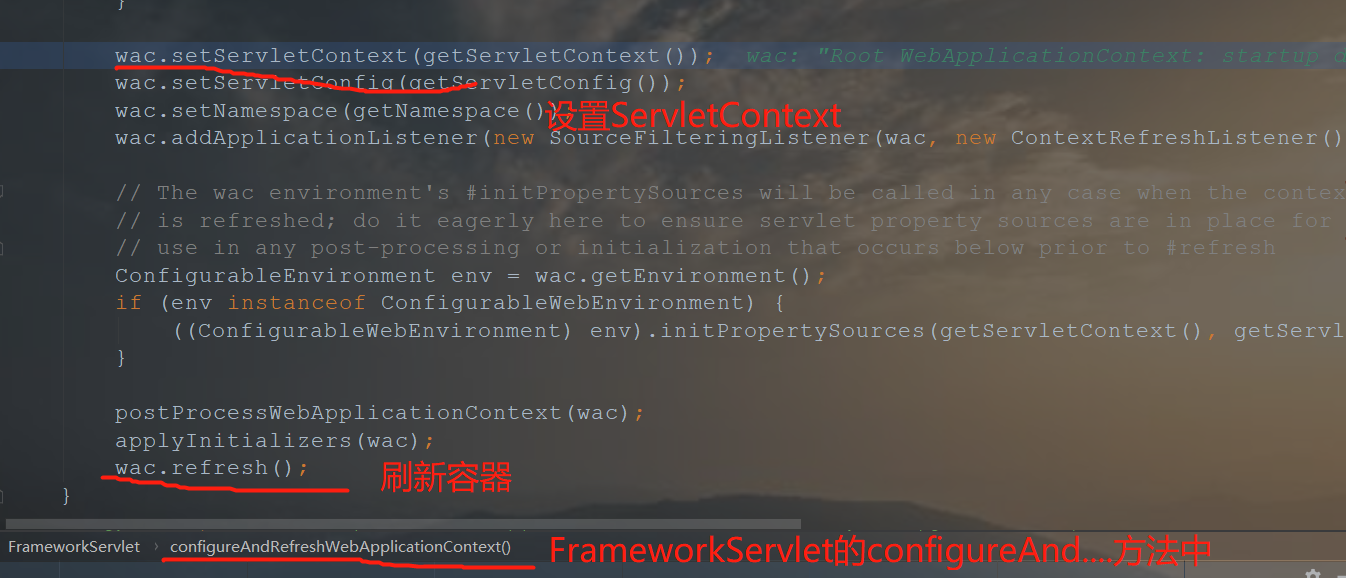
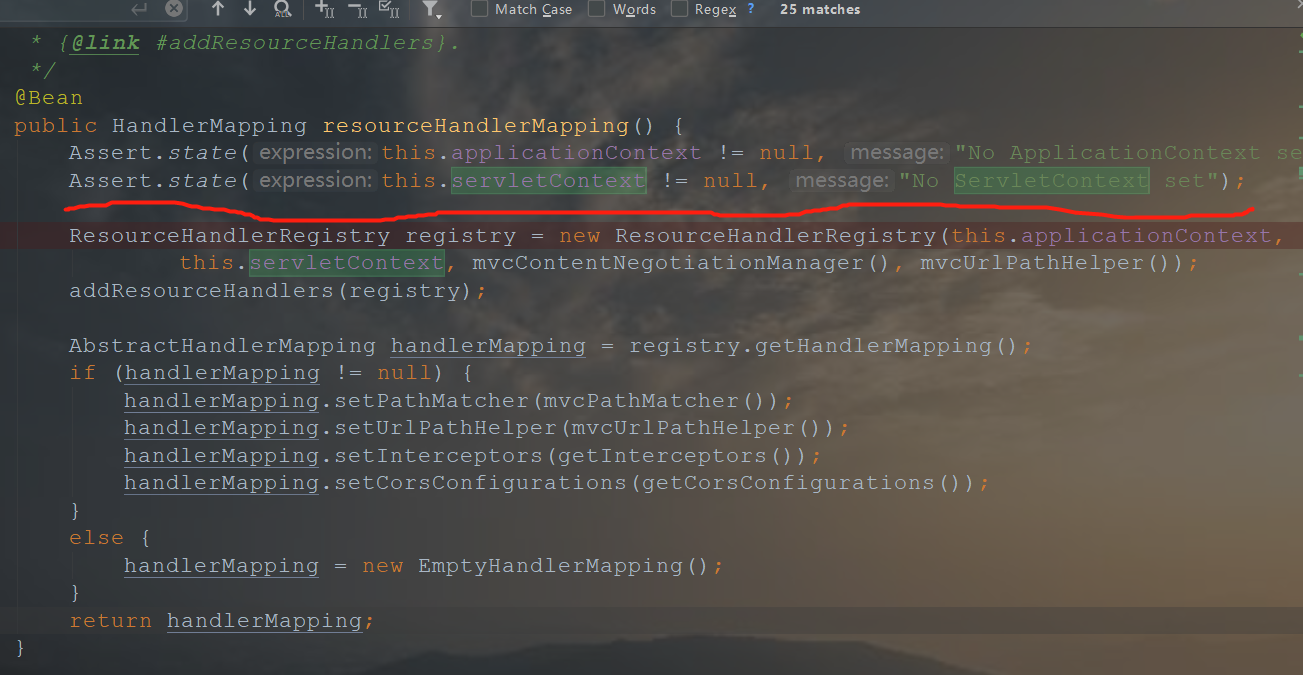
只有设置了ServletContext,断言的时候才不会报错,如果没有把自己手写的ac.refresh注释掉,因为容器中没有ServletContext,项目时运行不了的
只有执行完FrameworkServlet里的initWebApplicationContext,设置了ServletContext,才能将SpringMVC进行刷新
- 注:ServletContext 代表一个程序的应用,管理我们的Servlet,而且所有的Servlet都可以共享这个Context


还有,我已经在一篇博客中讲过SpringMVC是怎么随着Tomcat中启动的,有兴趣可以去看下,为什么配置了一个MyWebApplicationInitializer,该类只是实现了WebApplicationInitializer就可以随着Tomcat启动(很有趣的哦)
AppConfig.java1
2
3
4
5
6
7
8
9
10package com.lnw.config;
import org.springframework.context.annotation.ComponentScan;
import org.springframework.context.annotation.Configuration;
import org.springframework.web.servlet.config.annotation.EnableWebMvc;
@Configuration
@ComponentScan("com.lnw")
@EnableWebMvc
public class AppConfig{
}
AppConfig类就只是一个普通的Spring配置类,标明扫描包的路径,开启SpringMVC的注解
这里为什么要加@EnableWebMVC注解呢?
这个问题很重要!
加上@EnableWebMVC注解,会在Spring容器中引入一个DelegatingWebMvcConfiguration类,这个类又继承自WebMvcConfigurationSupport类
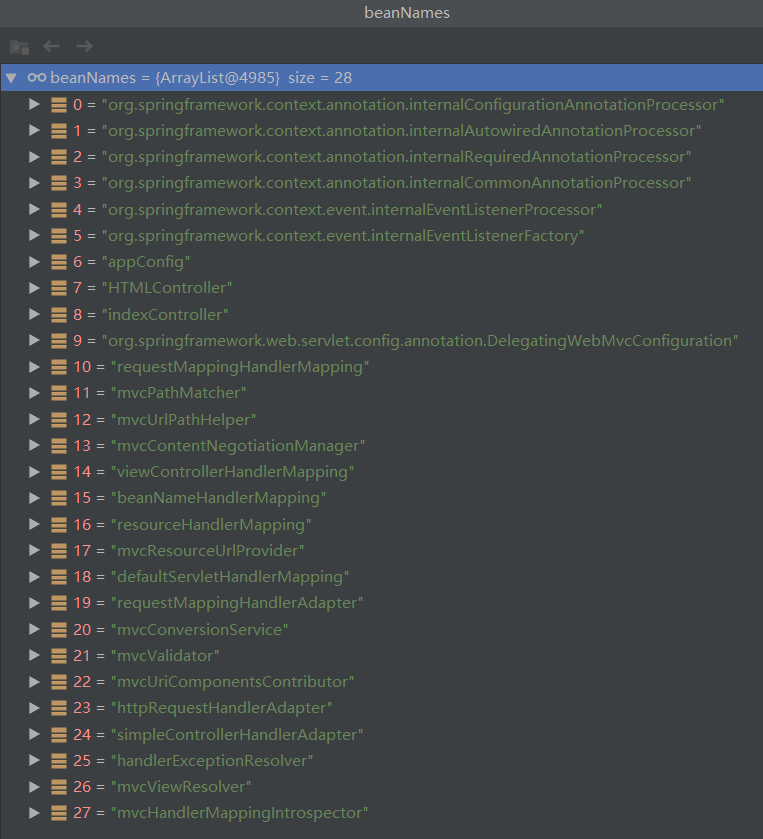
WebMvcConfigurationSupport里面配置了需要SpringMVC的许多默认选项,比如SpringMVC的九大组件,大多都是在这个类中默认配置(除了文件上传的那个组件好像没有默认配置)
WebMvcConfigurationSupport类里面配置了很多SpringMVC许多组件默认的Bean,截取相关代码
WebMvcConfigurationSupport.java1
2
3
4
5
6
7
8
9
10
11
12
13
14
15
16
17
18
19
20
21
22
23
24
25
26
27
28
29
30
31
32
33 @Bean
public BeanNameUrlHandlerMapping beanNameHandlerMapping() {
BeanNameUrlHandlerMapping mapping = new BeanNameUrlHandlerMapping();
mapping.setOrder(2);
mapping.setInterceptors(getInterceptors());
mapping.setCorsConfigurations(getCorsConfigurations());
return mapping;
}
@Bean
public ViewResolver mvcViewResolver() {
ViewResolverRegistry registry = new ViewResolverRegistry(
mvcContentNegotiationManager(), this.applicationContext);
configureViewResolvers(registry);
if (registry.getViewResolvers().isEmpty() && this.applicationContext != null) {
String[] names = BeanFactoryUtils.beanNamesForTypeIncludingAncestors(
this.applicationContext, ViewResolver.class, true, false);
if (names.length == 1) {
registry.getViewResolvers().add(new InternalResourceViewResolver());
}
}
ViewResolverComposite composite = new ViewResolverComposite();
composite.setOrder(registry.getOrder());
composite.setViewResolvers(registry.getViewResolvers());
if (this.applicationContext != null) {
composite.setApplicationContext(this.applicationContext);
}
if (this.servletContext != null) {
composite.setServletContext(this.servletContext);
}
return composite;
}
也就是说,加了@EnableWebMVC的注解,引入WebMVCConfigurationSupport类,创建配置类,Spring容器中就会有了许多SpringMVC组件的默认配置的Bean,然后在SpringMVC的DispatcherServlet中,需要组件初始化的时候就可以从Spring容器中获取这些默认的Bean
这样一来,运行添加的Tomcat插件(Tomcat版本最高为7…) ,就可顺利运行SpringMVC项目
如果想配置SpringMVC的其他属性,比如静态资源,模板引擎,文件上传的大小..
需要声明一个配置类,实现WebMvcConfigurer类,重写里面的方法即可
SpringMVC运行的初始化
SpringMVC的运行,离不开九大组件,而且SpringMVC的本质就是一个Servlet,所以在Tomcat启动的时候就会调用Init方法对Servlet的方法进行初始化
这里就要说一下SpringMVC的三个Servlet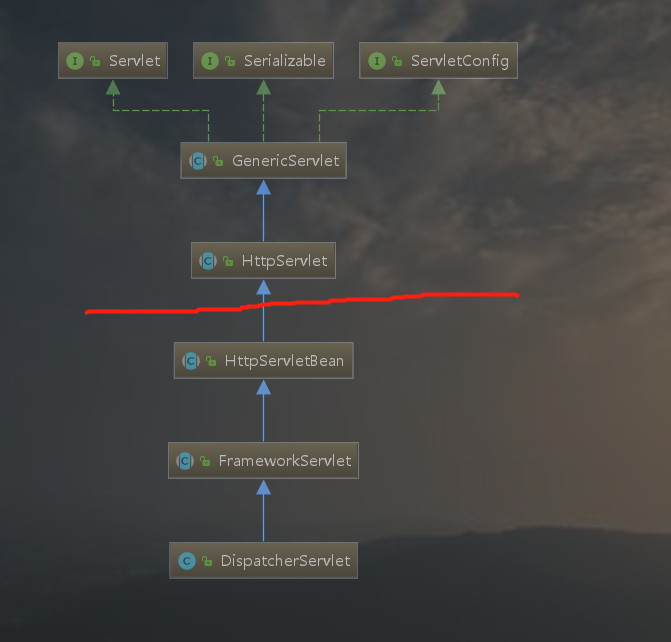
红线上部分是Servlet的类,下部分是SpringMVC的三个Servlet(哎,反正就是一个Servlet)
所以注册Servlet的时候就会调用Servlet的init方法
HttpServletBean
先执行HTTPServletBean的init方法1
2
3
4
5
6
7
8
9
10
11
12
13
14
15
16
17
18
19
20
21
22
23
24
25
26
27
28
29
30
31
32
33/**
* init()中,首先将Servlet中的配置参数使用BeanWrapper设置到DispatcherServlet的相关属性
* 然后调用模板方法initServletBean()初始化
*/
public final void init() throws ServletException {
// 将Servlet中的配置参数封装到pvs中
// Set bean properties from init parameters.
PropertyValues pvs = new ServletConfigPropertyValues(getServletConfig(), this.requiredProperties);
if (!pvs.isEmpty()) {
try {
// bw为DispatcherServlet
BeanWrapper bw = PropertyAccessorFactory.forBeanPropertyAccess(this);
ResourceLoader resourceLoader = new ServletContextResourceLoader(getServletContext());
bw.registerCustomEditor(Resource.class, new ResourceEditor(resourceLoader, getEnvironment()));
// 模板方法,可以在子类调用,做一些初始化工作,bw就是DispatcherServlet,
// 也就是初始化DispatcherServlet
initBeanWrapper(bw);
// 将配置的初始值(如contextConfigLocation)设置到DispaterServlet
bw.setPropertyValues(pvs, true);
}
catch (BeansException ex) {
if (logger.isErrorEnabled()) {
logger.error("Failed to set bean properties on servlet '" + getServletName() + "'", ex);
}
throw ex;
}
}
// Let subclasses do whatever initialization they like.
// 一般都是FrameWorkServlet的初始化入口
initServletBean();
}
FrameworkServlet
然后调用FrameworkServlet的 initServletBean 方法,但是 initServlet 方法中,又调用 initWebApplicationContext() 方法初始化容器,所以FrameworkServlet的关键初始话方法就是 initWebApplicationContext() 方法了
org.springframework.web.servlet.FrameworkServlet#initWebApplicationContext1
2
3
4
5
6
7
8
9
10
11
12
13
14
15
16
17
18
19
20
21
22
23
24
25
26
27
28
29
30
31
32
33
34
35
36
37
38
39
40
41
42
43
44
45
46
47
48
49
50
51
52
53
54
55
56
57
58
59
60
61
62protected WebApplicationContext initWebApplicationContext() {
/*----------------------------------------------------------*/
// initWebApplicationContext方法主要做了三件事:
// 1、获取spring的根容器rootContext
// 2、设置webApplicationContext并根据情况调用refresh方法
// 3、将webApplicationContext设置到Servlet中
/*----------------------------------------------------------*/
// 1
WebApplicationContext rootContext =
WebApplicationContextUtils.getWebApplicationContext(getServletContext());
WebApplicationContext wac = null;
if (this.webApplicationContext != null) {
// A context instance was injected at construction time -> use it
wac = this.webApplicationContext;
if (wac instanceof ConfigurableWebApplicationContext) {
ConfigurableWebApplicationContext cwac = (ConfigurableWebApplicationContext) wac;
if (!cwac.isActive()) {
// The context has not yet been refreshed -> provide services such as
// setting the parent context, setting the application context id, etc
if (cwac.getParent() == null) {
// The context instance was injected without an explicit parent -> set
// the root application context (if any; may be null) as the parent
cwac.setParent(rootContext);
}
// 2
configureAndRefreshWebApplicationContext(cwac);
}
}
}
if (wac == null) {
// No context instance was injected at construction time -> see if one
// has been registered in the servlet context. If one exists, it is assumed
// that the parent context (if any) has already been set and that the
// user has performed any initialization such as setting the context id
wac = findWebApplicationContext();
}
if (wac == null) {
// No context instance is defined for this servlet -> create a local one
wac = createWebApplicationContext(rootContext);
}
if (!this.refreshEventReceived) {
// Either the context is not a ConfigurableApplicationContext with refresh
// support or the context injected at construction time had already been
// refreshed -> trigger initial onRefresh manually here.
synchronized (this.onRefreshMonitor) {
//2
onRefresh(wac);
}
}
if (this.publishContext) {
// 3
// Publish the context as a servlet context attribute.
String attrName = getServletContextAttributeName();
getServletContext().setAttribute(attrName, wac);
}
return wac;
}
webApplicationContext在我们的配置类中已经注册给DispatcherServlet,DispatcherServlet又把WebApplication交给FrameworkServlet,所以这里会执行 configureAndRefreshWebApplicationContext(cwac) 方法
如果没有webApplicationContext则SpringMVC自己创建createWebApplicationContext(),内部也是调用configureAndRefreshWebApplicationContext方法
org.springframework.web.servlet.FrameworkServlet#configureAndRefreshWebApplicationContext1
2
3
4
5
6
7
8
9
10
11
12
13
14
15
16
17
18
19
20
21
22
23
24
25
26
27
28
29
30
31
32
33
34
35
36
37
38
39
40
41protected void configureAndRefreshWebApplicationContext(ConfigurableWebApplicationContext wac) {
if (ObjectUtils.identityToString(wac).equals(wac.getId())) {
// The application context id is still set to its original default value
// -> assign a more useful id based on available information
if (this.contextId != null) {
wac.setId(this.contextId);
}
else {
// Generate default id...
wac.setId(ConfigurableWebApplicationContext.APPLICATION_CONTEXT_ID_PREFIX +
ObjectUtils.getDisplayString(getServletContext().getContextPath()) + '/' + getServletName());
}
}
// 设置ServletContext容器,这很重要,九大组件的创建需要ServletContext
wac.setServletContext(getServletContext());
// 设置ServletConfig
wac.setServletConfig(getServletConfig());
wac.setNamespace(getNamespace());
/**
* 这里添加了一个监听器,这个监听器很重要
* 监听的是ContextRefreshListener事件,也就是容器刷新时的事件
* 当发生刷新容器事件时,会调用FrameworkServlet的onApplicationEvent方法
* 该方法里面就会调用onRefresh()进行初始化九大组件
*/
wac.addApplicationListener(new SourceFilteringListener(wac, new ContextRefreshListener()));
// The wac environment's #initPropertySources will be called in any case when the context
// is refreshed; do it eagerly here to ensure servlet property sources are in place for
// use in any post-processing or initialization that occurs below prior to #refresh
ConfigurableEnvironment env = wac.getEnvironment();
if (env instanceof ConfigurableWebEnvironment) {
((ConfigurableWebEnvironment) env).initPropertySources(getServletContext(), getServletConfig());
}
postProcessWebApplicationContext(wac);
applyInitializers(wac);
// 刷新容器
wac.refresh();
}
这里最重要的就是添加了ContextRefreshListener监听器,这个监听器很重要,在代码的最后调用 wac.refresh 刷新后,会执行这个ContextRefreshListener监听器触发事件
ContextRefreshListener是Framework的内部类里面只有一段代码1
2
3
4
5
6private class ContextRefreshListener implements ApplicationListener<ContextRefreshedEvent> {
@Override
public void onApplicationEvent(ContextRefreshedEvent event) {
FrameworkServlet.this.onApplicationEvent(event);
}
}
onApplicationEvent方法1
2
3
4
5
6public void onApplicationEvent(ContextRefreshedEvent event) {
this.refreshEventReceived = true;
synchronized (this.onRefreshMonitor) {
onRefresh(event.getApplicationContext());
}
}
就是当发生容器的刷新时,最后会执行 onRefresh 方法,该方法在DispatcherServlet具体实现
- 注:wac.refresh() 方法就是Spring-Context的知识,也就是IOC,Bean的生成管理等,这里不深入阐述
来看下DispatcherServlet
DispatcherServlet
上面说到当发生刷新容器的事件时,会调用 onRefresh 方法,该方法在DispatcherServlet中具体实现,而里面只是调用了 initStrategies 方法1
2
3
4
5
6
7
8
9
10
11
12
13
14
15
16
17
18
19
20
21
22
23
24
25
26
27
28
29
30
31
32
33
34
35@Override
protected void onRefresh(ApplicationContext context) {
// 只执行了initStrategies方法
initStrategies(context);
}
protected void initStrategies(ApplicationContext context) {
// 初始化MultipartResolver组件
// 该组件是用来处理上传文件请求,只是没有默认实现
initMultipartResolver(context);
// 初始化LocaleResolver
// 该组件的作用是可以通过request解析出Locale,Locale是对当前区域的声明
initLocaleResolver(context);
// 初始化ThemeResolver
// 该组件的作用是可以通过request解析出Theme主题
initThemeResolver(context);
// 初始化HandlerMapping组件
// 该组件的作用是存储URL跟Controller之间的映射
initHandlerMappings(context);
// 初始化HandlerAdapters
// 该组件的作用是可以用Handler(Controller)执行请求
initHandlerAdapters(context);
// 初始化HandlerExceptionResolvers组件
// 该组件的作用是对页面渲染前的异常进行处理。然后渲染在View里面
initHandlerExceptionResolvers(context);
// 初始化RequestToViewNamTranslator组件
// 该组件的作用是,如果Controller没有返回值,则通过request确定ViewName值,然后查询View
initRequestToViewNameTranslator(context);
// 初始化ViewResolvers组件
// 该组件的作用是将String类型的视图名和Locale解析为View类型的视图
initViewResolvers(context);
// 初始化FlashMapManager组件
// 该组件的作用是用于管理FlashMap的
initFlashMapManager(context);
}
到此,SpringMVC的初始化就到这了,下面来看下当一个请求过来时,SpringMVC是怎么工作的
SpringMVC对请求的处理过程
我们事先写一个Controller1
2
3
4
5
6
7@RestController
public class IndexController {
@GetMapping("/hello")
public String hello(){
return "Hello Tomcat!";
}
}
我们来具体跟踪一下,当我们输入请求localhost:8080/hello,SpringMVC里面是怎么处理的
1、
首先,请求会先到达Tomcat,Tomcat会分配一个Socket线程来连接它,接着封装request和response,然后交给具体的Servlet,这里就是使用我们的DispatcherServlet,所以请求就从Servlet容器(Tomcat)传递到Servlet (发生在:Servlet容器)
2、
接着,HttpServlet先处理,在service方法中,将ServletRequest和ServletResponse转换成HttpServletRequest和HttpServletResponse,并调用service方法 (发生在:Servlet-api的HttpServlet中)
3、
接下来SpringMVC出场了,FrameworkServlet的service首先处理,但是,service方法又会将请求先交给HttpServlet的service处理 (发生在:FrameworkServlet)1
2
3
4
5
6
7
8
9
10
11
12
13
14
15
16
17
18
19
20
21/**
* 实现了HttpServlet的service方法
* 不管是什么请求,最后都会走processRequest方法
* Override the parent class implementation in order to intercept PATCH requests.
*/
@Override
protected void service(HttpServletRequest request, HttpServletResponse response)
throws ServletException, IOException {
// 添加了对PATCH请求的处理
HttpMethod httpMethod = HttpMethod.resolve(request.getMethod());
if (httpMethod == HttpMethod.PATCH || httpMethod == null) {
processRequest(request, response);
}
// 其他类型全部交给父类处理,也就是交给HttpServlet处理
// 但是由于FrameworkServlet重写了get,post,put等请求方法,最后还是会调用该类的
// 其他请求方法比如doGet()
else {
super.service(request, response);
}
// 反正不管是什么方法,最后都会走processRequest方法
}
4、
在HttpServlet的service方法中,会根据请求的类型将请求传递到doGet方法 (发生在:HttpServlet中)
5、
由于FrameworkServlet实现了doGet方法,所以请求又回到了FrameworkServlet中,而doGet方法中只调用了 processRequest 方法。这里需要说明一下,几乎所有的请求都会交给 processRequest 方法处理
例如1
2
3
4
5
6
7
8
9
10
11
12@Override
protected final void doGet(HttpServletRequest request, HttpServletResponse response)
throws ServletException, IOException {
processRequest(request, response);
}
@Override
protected final void doPost(HttpServletRequest request, HttpServletResponse response)
throws ServletException, IOException {
processRequest(request, response);
}
...
processRequest 里面有调用 doService 方法,该方法在DispatcherServlet中具体实现,也就是说最后将请求交给了DispatcherServlet (发生在FrameworkServlet中)
6、
DispatcherServlet的doService方法将webApplicationContext、localeResolver、themeResolver、outputFlashMap和FlashMapManager设置到了request属性中,然后将请求交给doDispatch方法中 (发生在:DispatcherServlet)
org.springframework.web.servlet.DispatcherServlet#doService1
2
3
4
5
6
7
8
9
10
11
12
13
14
15
16
17
18
19
20
21
22
23
24
25
26
27
28
29
30
31
32
33
34
35
36
37
38
39
40
41
42
43
44
45
46
47
48
49
50
51
52protected void doService(HttpServletRequest request, HttpServletResponse response) throws Exception {
logRequest(request);
// 对include请求,进行request的attribute做快照备份
Map<String, Object> attributesSnapshot = null;
if (WebUtils.isIncludeRequest(request)) {
attributesSnapshot = new HashMap<>();
Enumeration<?> attrNames = request.getAttributeNames();
while (attrNames.hasMoreElements()) {
String attrName = (String) attrNames.nextElement();
if (this.cleanupAfterInclude || attrName.startsWith(DEFAULT_STRATEGIES_PREFIX)) {
attributesSnapshot.put(attrName, request.getAttribute(attrName));
}
}
}
// 对request设置一些属性,在handler和view中需要使用到
// Make framework objects available to handlers and view objects.
request.setAttribute(WEB_APPLICATION_CONTEXT_ATTRIBUTE, getWebApplicationContext());
request.setAttribute(LOCALE_RESOLVER_ATTRIBUTE, this.localeResolver);
request.setAttribute(THEME_RESOLVER_ATTRIBUTE, this.themeResolver);
request.setAttribute(THEME_SOURCE_ATTRIBUTE, getThemeSource());
if (this.flashMapManager != null) {
// 都跟FlashMap 有关,主要作用域redirect转发时参数的传递
// 应用场景:
// 当你提交完订单后,需要重定向到一个页面,但是重定向无法传递参数过去
// 这时,你可以使用FlashMap帮助你完成参数的传递
// 每次处理请求时,都会先判断一下FlashMap中是否有数据
// 如果有就先设置到 inputFlashMap里面,也就是保存上次转发过来的属性
// 再设置到Model里面
FlashMap inputFlashMap = this.flashMapManager.retrieveAndUpdate(request, response);
if (inputFlashMap != null) {
request.setAttribute(INPUT_FLASH_MAP_ATTRIBUTE, Collections.unmodifiableMap(inputFlashMap));
}
// OUTPUT_FLASH_MAP_ATTRIBUTE用于保存本次请求需要转发的属性
request.setAttribute(OUTPUT_FLASH_MAP_ATTRIBUTE, new FlashMap());
request.setAttribute(FLASH_MAP_MANAGER_ATTRIBUTE, this.flashMapManager);
}
try {
// 最后将请求交给doDispatch
doDispatch(request, response);
}
finally {
if (!WebAsyncUtils.getAsyncManager(request).isConcurrentHandlingStarted()) {
// Restore the original attribute snapshot, in case of an include.
// 还原request的快照属性
if (attributesSnapshot != null) {
restoreAttributesAfterInclude(request, attributesSnapshot);
}
}
}
}
7、
doDispatch是DispatcherServlet中最重要的方法,里面有很多判断和操作,但是主要有四个功能。在此之前先说下Handler、HandlerMapping跟HandlerAdapter三者之间的关系,还有View跟ViewResolver
Handler、HandlerMapping跟HandlerAdapter
Handler:就是我们编写的Controller控制器
HandlerMapping:可以用来速查Handler,可以根据request返回HandlerExecutionChain,HandlerExecutionChain里面包含Handler跟Interceptor
HandlerAdapter:当要执行我们的Controller时,SpringMVC就会使用HandlerAdapter来执行,调用handle方法,执行完返回ModelAndView
我们可以这样理解,Handler就是工具,可以用来做某件事;HandlerMapping是存放工具的清单,标明了工具放在哪里;HandlerAdapter就是使用工具干活的工人。
View跟ViewResolver
View是用来展示数据的
ViewResolver是用来查找View的
做完请求工作后,需要返回结果,而返回结果就需要模板,View就是所需的模板,ViewResolver就是用来选择哪个模板
这四个功能分别为:一、使用HandlerMapping找到可以干活的Handler; 二、找到合适的HandlerAdapter让他去干活; 三、让HandlerAdapter开始干活,干完活后返回数据; 四、将返回的数据进行处理,封装成View展示给用户
先来看下doDispatch方法的代码,具体代码再分析
org.springframework.web.servlet.DispatcherServlet#doDispatch1
2
3
4
5
6
7
8
9
10
11
12
13
14
15
16
17
18
19
20
21
22
23
24
25
26
27
28
29
30
31
32
33
34
35
36
37
38
39
40
41
42
43
44
45
46
47
48
49
50
51
52
53
54
55
56
57
58
59
60
61
62
63
64
65
66
67
68
69
70
71
72
73
74
75
76
77
78
79
80
81
82
83
84
85
86
87
88
89
90
91
92
93
94
95
96
97
98
99
100
101
102
103
104
105
106
107
108
109
110
111
112
113
114
115
116
117
118
119
120
121
122
123
124
125
126
127
128
129
130
131
132
133
134
135
136
137
138
139
140
141
142
143
144
145
146
147
148
149
150
151
152
153
154
155
156
157
158
159
160protected void doDispatch(HttpServletRequest request, HttpServletResponse response) throws Exception {
/**
*
* doDispatch中最重要的代码总共有四句(见下面的标签数字)
*
* Handler、HandlerMapping、HandlerAdapter三者的关系:
* Handler:就是我们的控制器Controller中加了@XXXMapping的方法
* HandlerMapping: 用来快速查找Handler
* HandlerAdapter:调用Handler来干活,而且不同Handler需要不同的Adapter
* 这就好比HandlerAdapter是工人,Handler是工具,HandlerMapping是根据加工的需求来选择用什么设备
*/
/**
* 封装Request,如果不是上传请求则直接使用接收到的request
* 如果是上传请求,重新封装成MultipartHttpServletRequest
*/
HttpServletRequest processedRequest = request;
/**
* 处理请求的处理器链
* 包含有处理器Handler和对应的拦截器Interceptor
*/
HandlerExecutionChain mappedHandler = null;
/**
* 是否为上传请求的标记
*/
boolean multipartRequestParsed = false;
/**
* 从request中获取异步请求
*/
WebAsyncManager asyncManager = WebAsyncUtils.getAsyncManager(request);
try {
/**
* View 跟 ViewResolver
* View 是用来展示数据的
* 而ViewResolver是用来查找View的
* 做完请求工作后,需要返回结果,而返回结果就需要模板,
* View就是所需要的模板,ViewResolver就是来选择哪个模板
*
* **/
ModelAndView mv = null;
/**
* 异常声明
* doDispatch()中对异常又两种处理方法:
* 一、如果是处理请求中出现的异常,会捕获并在processDispatchResult中渲染到最后的视图中
* 二、如果是渲染中出现异常,则直接抛出
*/
Exception dispatchException = null;
try {
// 检查是不是上传请求
processedRequest = checkMultipart(request);
multipartRequestParsed = (processedRequest != request);
/** 第一句
* 使用HandlerMapping找到可以干活的Handler
*
* **/
// Determine handler for the current request.
mappedHandler = getHandler(processedRequest);
if (mappedHandler == null) {
// 找不到Handler返回404
noHandlerFound(processedRequest, response);
return;
}
/** 第二句
* 找到合适的HandlerAdapter去让他干活
* **/
// Determine handler adapter for the current request.
HandlerAdapter ha = getHandlerAdapter(mappedHandler.getHandler());
// 处理GET、HEAD请求的last-modified
// Process last-modified header, if supported by the handler.
/**
* Last-Modified是HTTP头部的一种属性,表示当前请求的资源跟上一次请求的资源是否相同
* 如果相同,返回304并且没有新的实体(body)返回
* 否则返回新的实体内容
*
* 在浏览器第一次请求某一个URL时,服务器端的返回状态会是200,内容是客户端请求的资源,
* 同时有一个Last-Modified的属性标记此文件在服务器端最后被修改的时间。
* 客户端第二次请求此URL时,根据HTTP协议的规定,浏览器会向服务器传送If-Modified-Since报头,询问该时间之后文件是否有被修改过
* 如果服务器端的资源没有变化,则自动返回 HTTP 304(Not Changed.)状态码,内容为空,这样就节省了传输数据量。
* 当服务器端代码发生改变或者重启服务器时,则重新发出资源,
* 返回和第一次请求时类似。从而保证不向客户端重复发出资源,也保证当服务器有变化时,客户端能够得到最新的资源。
*/
String method = request.getMethod();
boolean isGet = "GET".equals(method);
if (isGet || "HEAD".equals(method)) {
long lastModified = ha.getLastModified(request, mappedHandler.getHandler());
if (new ServletWebRequest(request, response).checkNotModified(lastModified) && isGet) {
return;
}
}
/** 如果有拦截器,就饿执行我们的拦截器,preHandle前置处理**/
if (!mappedHandler.applyPreHandle(processedRequest, response)) {
return;
}
/** 第三句
* 让HandlerAdapter开始干活,干完活后返回数据
* **/
// Actually invoke the handler.
mv = ha.handle(processedRequest, response, mappedHandler.getHandler());
// 如果需要异步处理,则直接返回
/**
* 因为异步处理会重新开启一个线程去执行结果的返回
* 不会占用目前这个线程,所以可以直接返回
*/
if (asyncManager.isConcurrentHandlingStarted()) {
return;
}
// 当view为空时(比如,handler返回类型为void),根据request设置默认view
applyDefaultViewName(processedRequest, mv);
/** 执行了拦截器的后置处理 postHandle**/
mappedHandler.applyPostHandle(processedRequest, response, mv);
}
catch (Exception ex) {
dispatchException = ex;
}
catch (Throwable err) {
// As of 4.3, we're processing Errors thrown from handler methods as well,
// making them available for @ExceptionHandler methods and other scenarios.
dispatchException = new NestedServletException("Handler dispatch failed", err);
}
/** 第四句
* 将数据处理,通过View展示给用户
* 处理结果,包括处理异常,渲染页面,发出完成通知,触发拦截器的afterCompletion
* **/
processDispatchResult(processedRequest, response, mappedHandler, mv, dispatchException);
}
catch (Exception ex) {
triggerAfterCompletion(processedRequest, response, mappedHandler, ex);
}
catch (Throwable err) {
triggerAfterCompletion(processedRequest, response, mappedHandler,
new NestedServletException("Handler processing failed", err));
}
finally {
// 判断是否为异步请求
if (asyncManager.isConcurrentHandlingStarted()) {
// 执行异步的拦截器
// Instead of postHandle and afterCompletion
if (mappedHandler != null) {
mappedHandler.applyAfterConcurrentHandlingStarted(processedRequest, response);
}
}
else {
// 删除上传请求的资源,不然会产生临时的资源
// Clean up any resources used by a multipart request.
if (multipartRequestParsed) {
cleanupMultipart(processedRequest);
}
}
}
}
8、
getHandler方法获取Handler的过程,会遍历容器中所有的HandlerMapping,上面说到的WebMVCConfigurationSupport会默认创建RequestMappingHandlerMapping和BeanNameUrlHandlerMapping,在用RequestMappingHandlerMapping匹配时,我们的请求会和其初始化时读取到定义的@RequestMapping(“hello”)所注解里面的内容相匹配,然后根据这个条件找到定义的处理器方法,也就是我们的hello()方法
(发生在:RequestMappingHandlerMapping)
org.springframework.web.servlet.DispatcherServlet#getHandler
1
2
3
4
5
6
7
8
9
10
11protected HandlerExecutionChain getHandler(HttpServletRequest request) throws Exception {
if (this.handlerMappings != null) {
for (HandlerMapping mapping : this.handlerMappings) {
HandlerExecutionChain handler = mapping.getHandler(request);
if (handler != null) {
return handler;
}
}
}
return null;
}
9、
如果是使用@PathVariable注解,则会使用RequestMappingInfoHandlerMapping里的handleMatch方法会将匹配到的Pattern设置到Request属性中,这里我们没有使用@PathVariable,所以跳过
10、
找到Handler后,接着调用getHandlerAdapter方法根据Handler查找HandlerAdapter,也就是根据工具找到工人。查找的方式也是遍历配置的所有HandlerAdapter,然后分别调用他们的supports方法进行检查,判断Handler的类型是否支持。WebMvcConfigrationSupport类默认配置的HandlerAdapter是RequestMappingHandlerAdapter、HttpRequstHandlerAdapter和SimpleControllerHandlerAdapter,最后找到RequestMappingHandlerAdapter (发生在:DispatcherServlet)
11、
接下来检查到请求时GET请求,然后检查是否可以使用缓存(我那一大段注释可以看看),因为是第一次请求,所以不使用缓存;接着调用HandlerInterceptor的preHandler方法,这里我们没有配置拦截器,所以跳过。接下来用RequestMappingHandlerAdapter使用Handler处理请求,也就是调用 mv = ha.handle(processedRequest, response, mappedHandler.getHandler()); (发生在:DispatcherServlet中)
12、
HandlerAdapter的实现一般都很复杂,因为它要封装参数,参数有ModelAttribute,SessionAttributes,FlashMap,Request中的参数等等,所以RequestMappingHandlerAdapter会先将需要的参数封装,这里我们没有设置参数,可省略,接着讲请求传递给invokeHandleMethod方法 (发生在:RequestMappingHandlerAdapter)
13、
invokeHandleMethod方法首先创建WebDataBinderFactory、ModelFactory和ServletInvocableHandlerMethod。
WebDataBinderFactory跟@InitBinder注解的绑定参数有关
ModelFactory主要是对Model的初始化和更新
ServletInvocableHandlerMethod就是执行请求,参数的绑定
而且,不同类型的参数的解析器是不同的,比如@PathVariable参数、RedirectAttributes参数、Model里的参数分别对应PathVariableMethodArgumentResolver、RedirectAttributeMethodArgumentResolver和ModelMethodProcessor
具体执行在doInvoke中
org.springframework.web.servlet.mvc.method.annotation.RequestMappingHandlerAdapter#invokeHandlerMethod
1
2
3
4
5
6
7
8
9
10
11
12
13
14
15
16
17
18
19
20
21
22
23
24
25
26
27
28
29
30
31
32
33
34
35
36
37
38
39
40
41
42
43
44
45
46
47
48
49
50
51
52
53
54
55
56
57
58
59
60
61
62
63
64
65
66
67
68
69
70
71protected ModelAndView invokeHandlerMethod(HttpServletRequest request,
HttpServletResponse response, HandlerMethod handlerMethod) throws Exception {
ServletWebRequest webRequest = new ServletWebRequest(request, response);
try {
// 需要下面这三个工具
// WebDataBinderFactory的创建过程是将注解了@InitBinder的方法找出来,并
// 使用它们新建出ServletRequestDataBinderFactory类型的WebDataBinderFactory
WebDataBinderFactory binderFactory = getDataBinderFactory(handlerMethod);
// ModelFactory主要有两个功能:一、在处理器具体处理前对Model进行初始化
//二、处理完请求后对Model参数进行更新
ModelFactory modelFactory = getModelFactory(handlerMethod, binderFactory);
// 实际请求的处理就是通过它来执行的, 参数的绑定、处理请求以及返回值处理都在它里边完成
ServletInvocableHandlerMethod invocableMethod = createInvocableHandlerMethod(handlerMethod);
// 将argumentsResolvers、returnValueHandlers、binderFactory
// paramterNameDiscoverer设置进去invocableMethod中
if (this.argumentResolvers != null) {
invocableMethod.setHandlerMethodArgumentResolvers(this.argumentResolvers);
}
if (this.returnValueHandlers != null) {
invocableMethod.setHandlerMethodReturnValueHandlers(this.returnValueHandlers);
}
invocableMethod.setDataBinderFactory(binderFactory);
invocableMethod.setParameterNameDiscoverer(this.parameterNameDiscoverer);
// 新建ModelAndViewContainer容器, 并将相应的参数设置到Model中
ModelAndViewContainer mavContainer = new ModelAndViewContainer();
// 设置FlashMap
mavContainer.addAllAttributes(RequestContextUtils.getInputFlashMap(request));
// 使用ModelFactory将SessionAttribute和注释了@ModelAttribute的方法的参数设置到Model
modelFactory.initModel(webRequest, mavContainer, invocableMethod);
//
mavContainer.setIgnoreDefaultModelOnRedirect(this.ignoreDefaultModelOnRedirect);
// 异步处理的相关工作
AsyncWebRequest asyncWebRequest = WebAsyncUtils.createAsyncWebRequest(request, response);
asyncWebRequest.setTimeout(this.asyncRequestTimeout);
WebAsyncManager asyncManager = WebAsyncUtils.getAsyncManager(request);
asyncManager.setTaskExecutor(this.taskExecutor);
asyncManager.setAsyncWebRequest(asyncWebRequest);
asyncManager.registerCallableInterceptors(this.callableInterceptors);
asyncManager.registerDeferredResultInterceptors(this.deferredResultInterceptors);
if (asyncManager.hasConcurrentResult()) {
Object result = asyncManager.getConcurrentResult();
mavContainer = (ModelAndViewContainer) asyncManager.getConcurrentResultContext()[0];
asyncManager.clearConcurrentResult();
LogFormatUtils.traceDebug(logger, traceOn -> {
String formatted = LogFormatUtils.formatValue(result, !traceOn);
return "Resume with async result [" + formatted + "]";
});
invocableMethod = invocableMethod.wrapConcurrentResult(result);
}
// 执行请求
invocableMethod.invokeAndHandle(webRequest, mavContainer);
if (asyncManager.isConcurrentHandlingStarted()) {
return null;
}
// 处理完请求的后置处理
return getModelAndView(mavContainer, modelFactory, webRequest);
}
finally {
webRequest.requestCompleted();
}
}
14、
当执行完HandlerMethod(也就是执行完我们的Controller代码后),调用getModelAndView方法(我们代码执行完后的数据都设置在ModelAndViewContainer中)
方法中使用ModelAndViewContainer中的Model和View创建ModelAndView,将值返回给DispatcherServlet
org.springframework.web.servlet.mvc.method.annotation.RequestMappingHandlerAdapter#getModelAndView
1
2
3
4
5
6
7
8
9
10
11
12
13
14
15
16
17
18
19
20
21
22
23
24
25
26private ModelAndView getModelAndView(ModelAndViewContainer mavContainer,
ModelFactory modelFactory, NativeWebRequest webRequest) throws Exception {
// 更新Model(包括设置SessionAttribute)
modelFactory.updateModel(webRequest, mavContainer);
if (mavContainer.isRequestHandled()) {
return null;
}
ModelMap model = mavContainer.getModel();
// 创建ModelAndView
ModelAndView mav = new ModelAndView(mavContainer.getViewName(), model, mavContainer.getStatus());
if (!mavContainer.isViewReference()) {
mav.setView((View) mavContainer.getView());
}
// 如果是RedirectAttributes(重定向请求)
// 则将其值设置到FlashMap中
if (model instanceof RedirectAttributes) {
Map<String, ?> flashAttributes = ((RedirectAttributes) model).getFlashAttributes();
HttpServletRequest request = webRequest.getNativeRequest(HttpServletRequest.class);
if (request != null) {
RequestContextUtils.getOutputFlashMap(request).putAll(flashAttributes);
}
}
return mav;
}
(发生在:RequestMappingHandlerAdapter)
15、
然后判断返回的View是否为空,如果为空就使用RequestToViewNameTranslatior查找默认视图,接着调用HandlerInterceptor的后置方法applyPostHandle
16、
最后就调用processDispatchResult(processedRequest, response, mappedHandler, mv, dispatchException); 将结果渲染,里面是调用render方法进行页面的渲染。调用resolveViewName方法解析出View,解析过程使用到了ViewResolver,这里使用的是默认配置InternalResourceViewResolver(它可以处理jsp视图)
1 | private void processDispatchResult(HttpServletRequest request, HttpServletResponse response, |
总结
至此,SpringMVC的分析到此结束,里面还有很多东西没有说到,比如FlashMap是什么东西,FlashMap是怎么传递和管理的,九大组件各个组件的作用是什么,九大组件的实现类都有哪些..
我们只是讲讲SpringMVC的冰山一角而已